
Important! This article talks about cryptocurrency and provides a guide to setup a staking node that requires an investment in crypto. Please keep in mind that I’m sharing this out of interest only. I do not recommend this. I am not a financial advisor. This is a warning – given that cryptocurrency remains unregulated, there is a high risk of losing all investments made. If you follow any of these instructions, you do so at your own risk.
You’re likely familiar with Google, perhaps even Bing, and some may know about the privacy-conscious DuckDuckGo. But the world of search engines isn’t just confined to these big names. In fact, it extends to a vast and intriguing frontier, where search capabilities transform from simple utilities into promising income generators.
Have you ever wondered what it would be like to access search results from across all engines, streamlined into a single, comprehensive list? How about conducting searches with absolute privacy, all the while supporting a decentralized ecosystem?
Welcome to the world of Presearch – a decentralized, distributed search engine that operates across tens of thousands of nodes worldwide. This unique platform is not only making strides in the way we perceive and conduct searches but also transforming everyday users into earning participants of its network.
I heard about this project just recently and saw it as a way to create another small passive income stream so started operating my own node and realized that it was quite simple. And not only that, I found that I could do so very inexpensively. So, here’s a guide how to replicate this.
As a node operator, you’re essentially running a software that supports the network, accepting searches, and providing results. The incredible part? You’re earning a passive income simply by keeping this software up and running. The initial setup and subsequent operational costs are typically the only expenses. But, thanks to the fierce competition in cloud computing, you can now run a node for free for a significant amount of time.
Sounds intriguing, right? Well, it gets even better because you can start earning money with minimal initial investment.
In this comprehensive guide, we’ll navigate this exciting landscape together. I’ll demonstrate how to set up your own node, free of cost, and commence your journey towards a new, sustainable source of passive income. So, strap in and let’s dive into the innovative world of Presearch…
Before we begin, let’s make sure we’re on the same page. This article assumes some basic knowledge of cryptocurrency. If you’re not quite there yet, don’t worry – there are plenty of resources to help you get up to speed.
Now, let’s unravel the world of Presearch and PRE.
Presearch: This isn’t just your average search engine. Presearch is a groundbreaking ecosystem, complete with its search capabilities and supporting infrastructure.
PRE: Meet the token that fuels this ecosystem. PRE resides on the Ethereum blockchain and you can acquire it in several ways:
1. Purchase or Swap: Got an Ethereum wallet like Metamask? You can easily swap your ETH for PRE at the current market rate. And if you ever need to, you can switch back from PRE to ETH, USDC, or any other Ethereum-based cryptocurrency, or sell it for cash via an exchange.
2. Use and Earn: By using the Presearch website, you’ll earn PRE. It’s that simple. I’ve set Presearch as my default search engine on the Brave browser, and now, I’m accumulating both BAT and PRE tokens just by surfing the web as I usually do.
3. Run a Node: This is what our guide is all about, but more on this soon.
Interestingly, PRE can also be used to stake keywords on Presearch. When users search these terms, your specified page appears at the top of the search results, giving you a fantastic opportunity to drive traffic to your money-making websites.
By running a node, you’re not only supporting a revolutionary distributed system but also lining your pockets with PRE. The longer your node is operational, and the more you’ve staked, the higher your PRE earnings.
As of now, you’ll need to stake a minimum of 4,000 PRE, which at today’s rate (as of 2023-07-28) of $0.04 per PRE, equates to a roughly $160 initial investment.
Setting up your node requires some form of computational power, whether that’s on a home machine or a cloud-based virtual machine. If you’re just starting out, the latter option is probably the most economical. Thanks to cutthroat competition in cloud services, you can get a virtual machine up and running for little to no cost, ensuring your operational expenses don’t exceed your passive income.
That’s why, for the purposes of this guide, I’ll walk you through setting up a cost-effective Presearch node on Oracle Cloud, utilizing their 1-year free tier virtual machine. Thus, aside from your initial staking requirements, you’re looking at zero extra costs.
In essence, it’s a win-win scenario. You’re likely thinking, “Why haven’t I started this already?”
Stay with me, and you’ll soon be on your path to earning with Presearch.
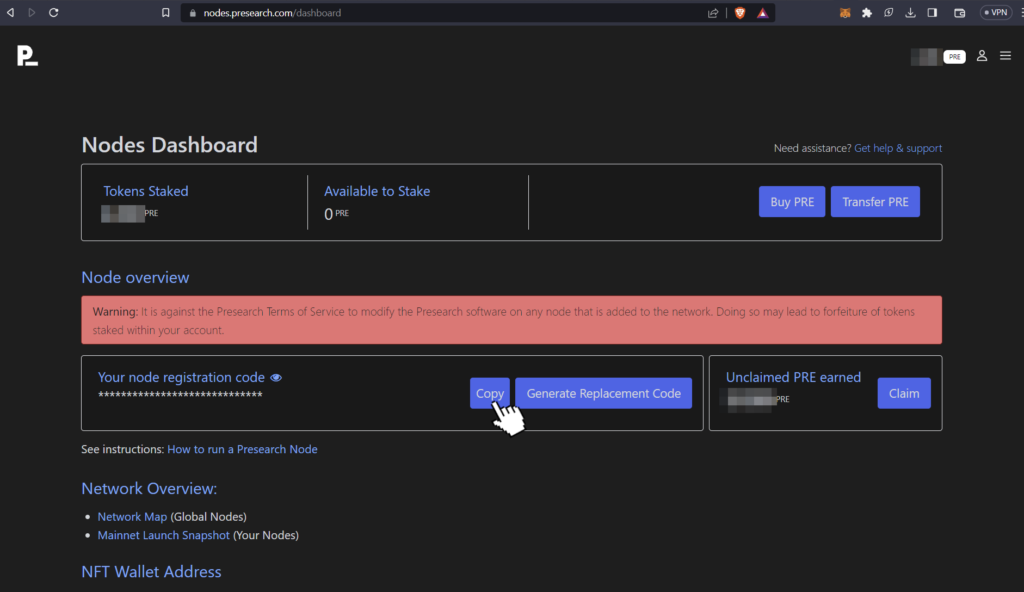
Step 1: Grab Your Presearch Node Registration Key
To kick off your passive income journey with Presearch, you’ll first need a registration key. So, if you’ve already registered with Presearch, sign in and head over to your node dashboard. Here, you’ll find a hidden registration key. You can either copy it now or keep it handy for later — we’re going to need it.
Step 2: Sign Up for Oracle Cloud’s Free Tier
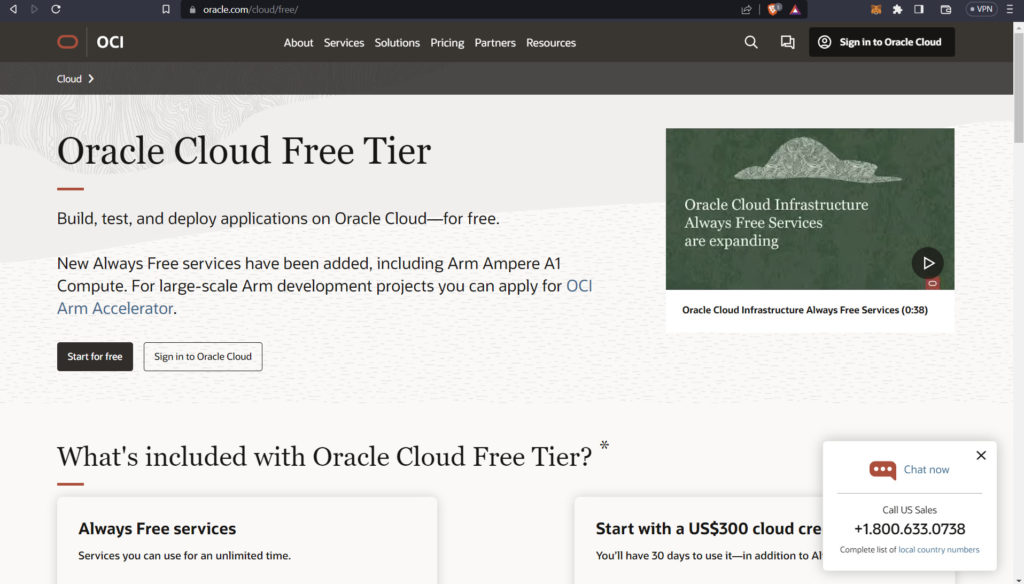
Next, it’s time to sign up for Oracle Cloud’s Free Tier. Just head over to their website and follow the steps to sign up. Don’t be surprised when you’re asked for your credit card details — you’ll see a nominal $1.00 charge, promptly refunded, to validate your card. It’s a standard process with many online services.
Step 3: Launch Your Compute Instance in the Always Free Tier
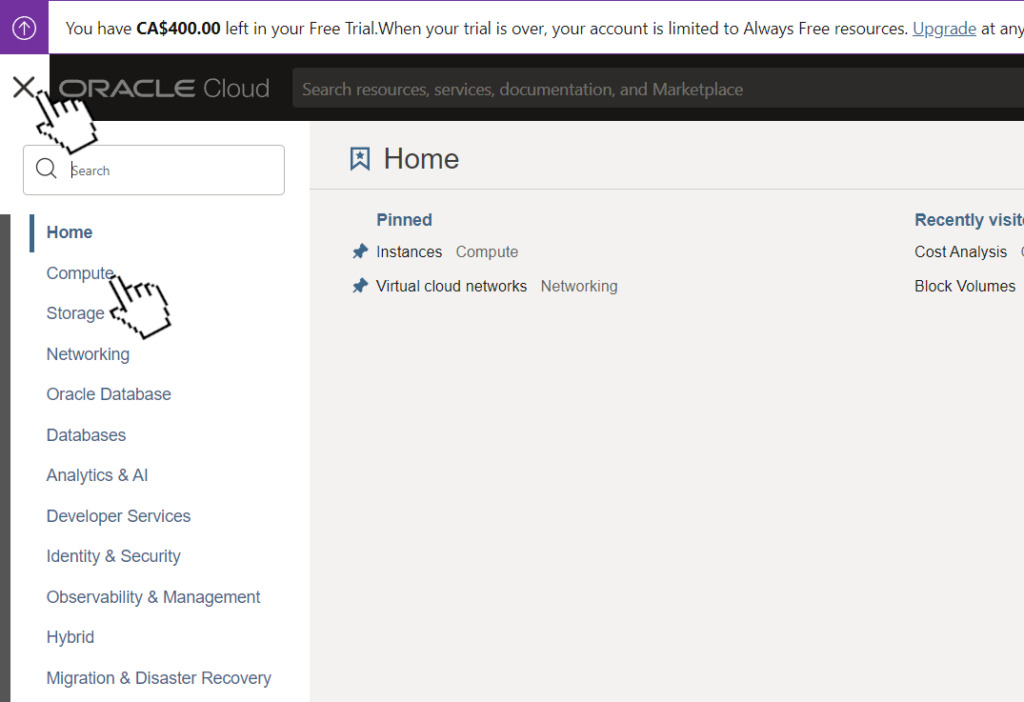
Once you’re all set with your Oracle Cloud account, dive into their portal. Click on the hamburger menu in the top left corner and select “Compute”.
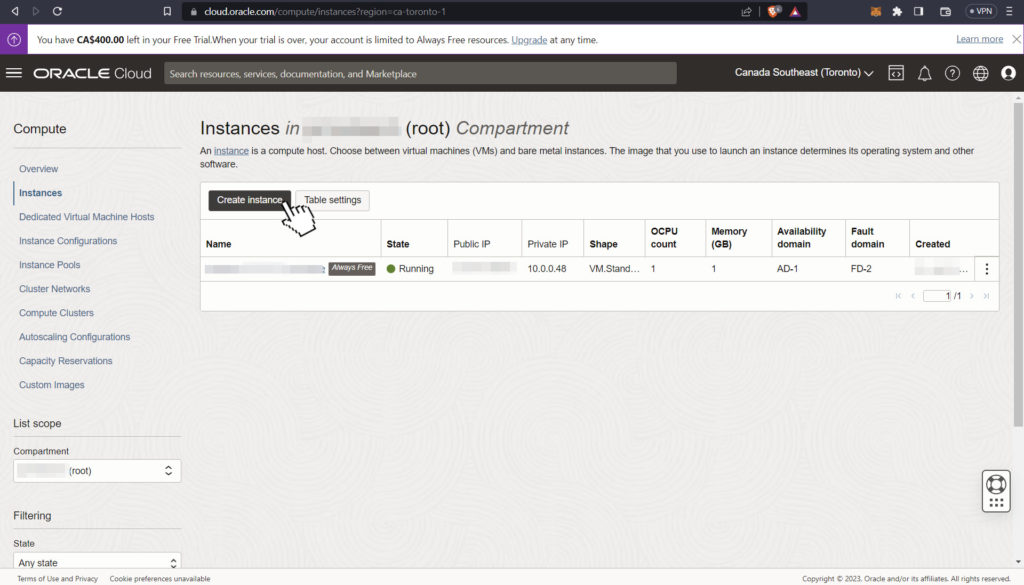
In the Compute view, click on “Instances”. You’ll notice that I already have an instance up and running in the screenshot below, but don’t worry — you can run up to four VM instances in the free tier, provided you stick to the default specifications. Click on the “Create Instance” button to proceed.
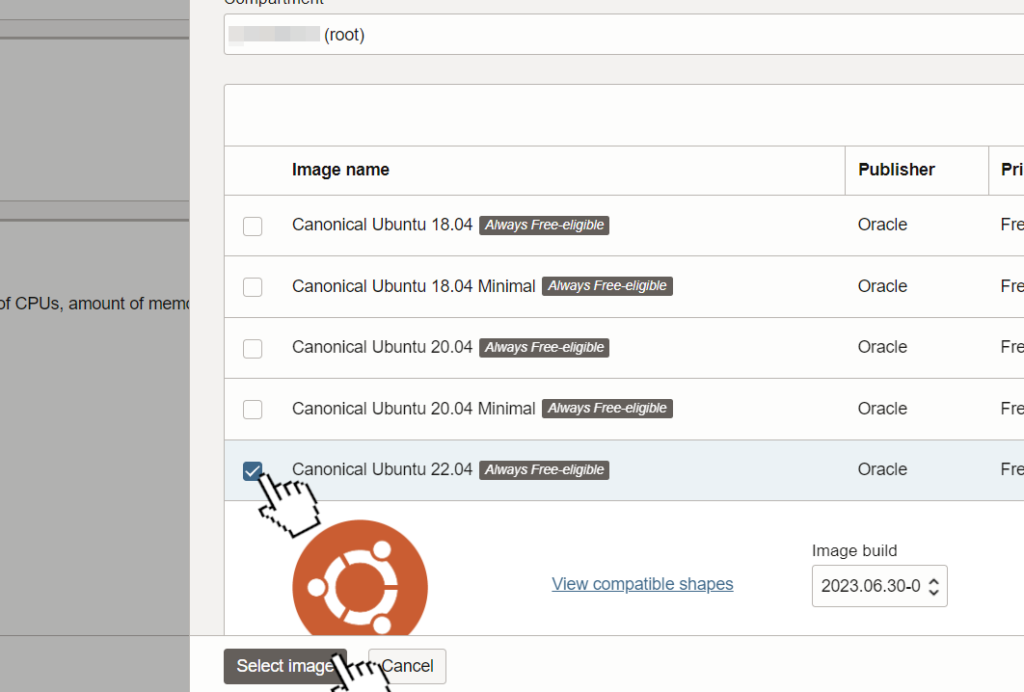
Feel free to customize your instance name in the following view. In the “Image and Shape” section, click “Edit”, then “Change Image”.
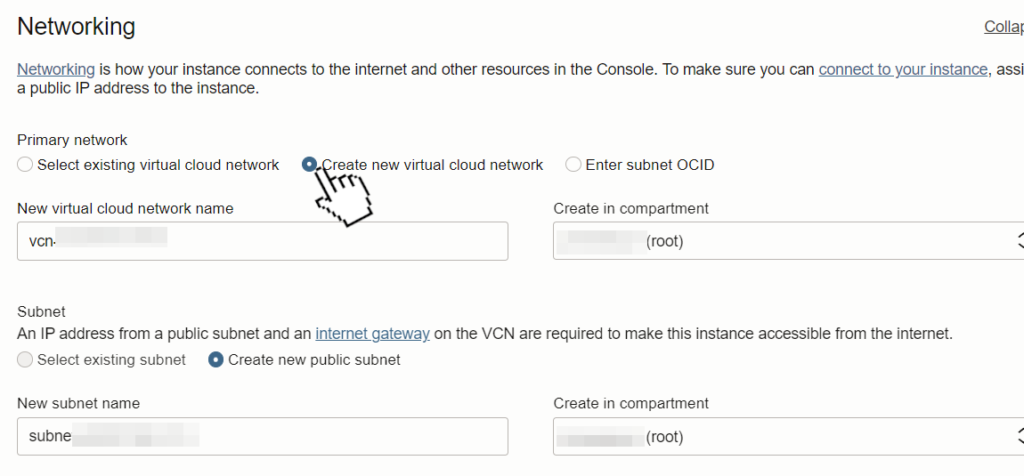
Under “Networking”, you might need to create a new virtual cloud network and public subnet. If you encounter an error while creating the VM, this is likely the cause. If you already have a network set up, you can decide whether to place this new VM in the same subnet.
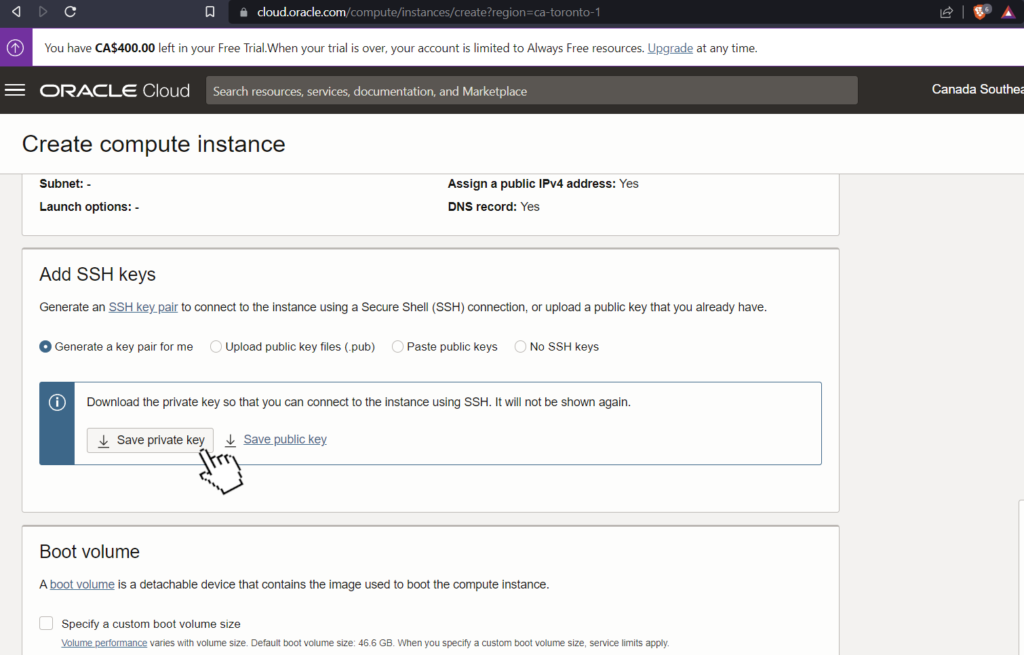
Scroll down to the section for downloading the SSH key. Download and save the private key to your local machine — it’s crucial for logging into your virtual machine to install the Presearch node.
Remember that a default 46.6 GB boot volume is attached to your VM under “Boot volume”. This is where your OS resides, and it uses up part of the 200 GB allowance of your free tier.
Finally, click “Create”, and Oracle will set up your VM, which may take a few minutes.
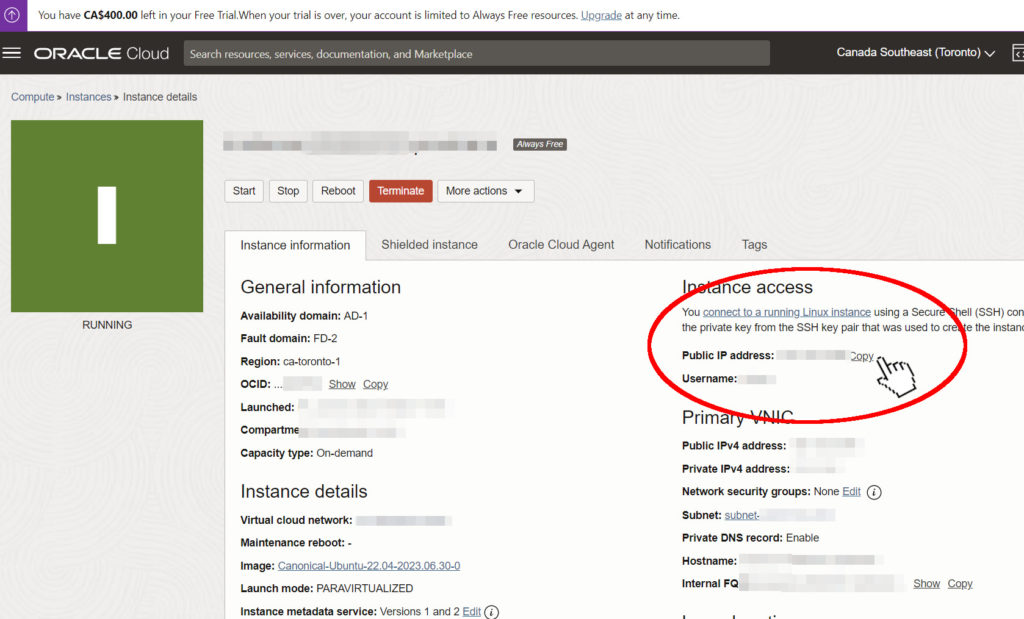
Once your VM is ready, go back to the Instances view. Here, you’ll see your VM up and running. Click on it to view the details, and copy the IP address, which is found on the top right. Also take note of you username. You will need that too.
Step 4: Log in to Your VM and Set Up Presearch Node
Open up your command prompt and navigate to the directory where you stored the .key file. For example, on Windows 11, if you saved it in your Downloads folder, you would type:
cd C:\Users\YourUsername\Downloads
If you’re on Windows, you also need to set permissions for the key:
icacls.exe keyname.key /inheritance:r /grant:r "%username%":(R)
Then you can use the built in ssh on Windows and use the ssh key to login to your VM, using the ip address and username copied from above (replace “keyname.key” with the filename of your key file, “username” with your username, and “instance-ip-address” with the ip address copied above :
ssh -i keyname.key username@instance-ip-address
At this point, you should have successfully logged into your Oracle Cloud VM. Now, it’s time to install Docker with these two commands:
curl -fsSL https://get.docker.com -o get-docker.sh
sudo sh get-docker.sh
Next, download and run the Preshare autoupdate container:
sudo docker run -d --name presearch-auto-updater --restart=unless-stopped -v /var/run/docker.sock:/var/run/docker.sock presearch/auto-updater --cleanup --interval 900 presearch-auto-updater presearch-node
Then pull the node container and run it with these two commands. Note that you will have to replace the registration code where is says “YourRegistrationCodeHere” :
sudo docker pull presearch/node

sudo docker run -dt --name presearch-node --restart=unless-stopped -v presearch-node-storage:/app/node -e REGISTRATION_CODE=YourRegistrationCodeHere presearch/node
And just like that, your Presearch node is up and running!!!! (That’s assuming that all went well and you have no errors).
Back in your node dashboard on the Presearch site, you should be able to see your node now running and see statistics about your node. Here, you can stake your PRE coin. As mentioned above, you will need a minimum of 4000 PRE.
Take a look at this screenshot of statistics for a node now running for about 20 hours, staking just over the minimum 4000 PRE tokens, it has earned about 3.2 PRE.
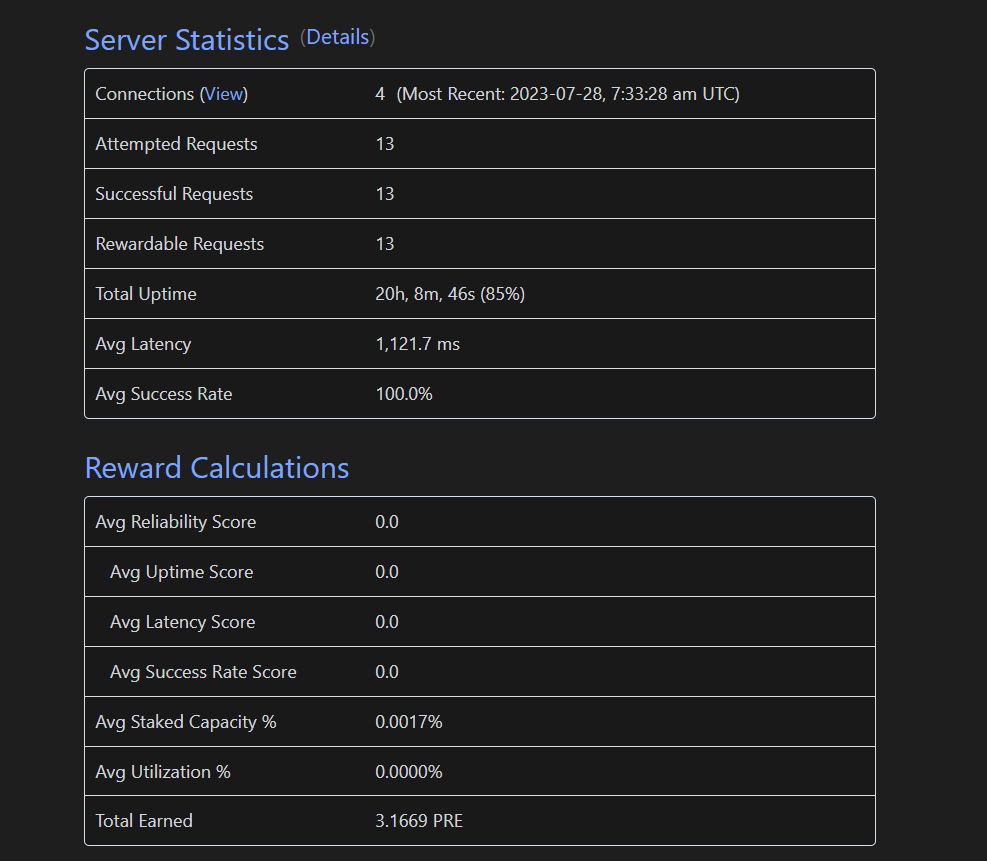
While this won’t make you a millionaire overnight, it’s a solid way to earn passive income. The more you stake, the more you can potentially earn. However, remember that the more you invest, the greater the risk. Only invest what you can afford to lose.
I hope this guide is helpful to you. I’ll be tracking and reporting my passive income from staking over on my stats page.
If you know about other cryptocurrencies offering similar rewards, I’d love to hear about them! Let’s learn and grow together on this exciting passive income journey.
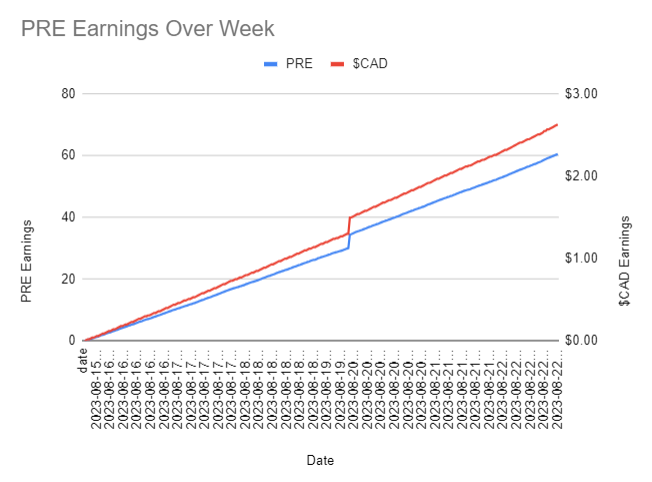
Update (2023-08-22) : Node is still up and still running smooth as butter. It’s incredible, really. It doesn’t get any more passive than this. Since I published this article, I’ve upped my node stake to around 11,000 PRE. At the current exchange rate, that’s about $450 CAD. It seems like quite a bit, but it’s generating about $3 per week in totally passive income (> $150 per year). And assuming that the price doesn’t drop to an abysmal level, and assuming this isn’t a giant scam, my $450 can be withdrawn fairly easily.
Here’s a graph showing a recent week’s worth of earnings with 11k stake (I created a python script that keeps calling the Preshare node api endpoint to retrieve earnings every 30 minutes):
Update (2023-07-29) : After about 24 total hours of uptime, the 4k PRE stake has earned 4.5951 PRE. At the current price, that is $0.032 * 4.5951 = $0.15. Not much!! lol! Assuming it keeps going at the same rate, after 30 days, I’ll have $4.50. It’s a coffee at least! LOL
Leave a Reply